How to Test Webhooks Locally Without Exposing Your Localhost
How to Test Webhooks Locally Without Exposing Your Localhost If you're building an integration with a service like Stripe, Shopify, GitHub, or Slack, you'll eventually run into...
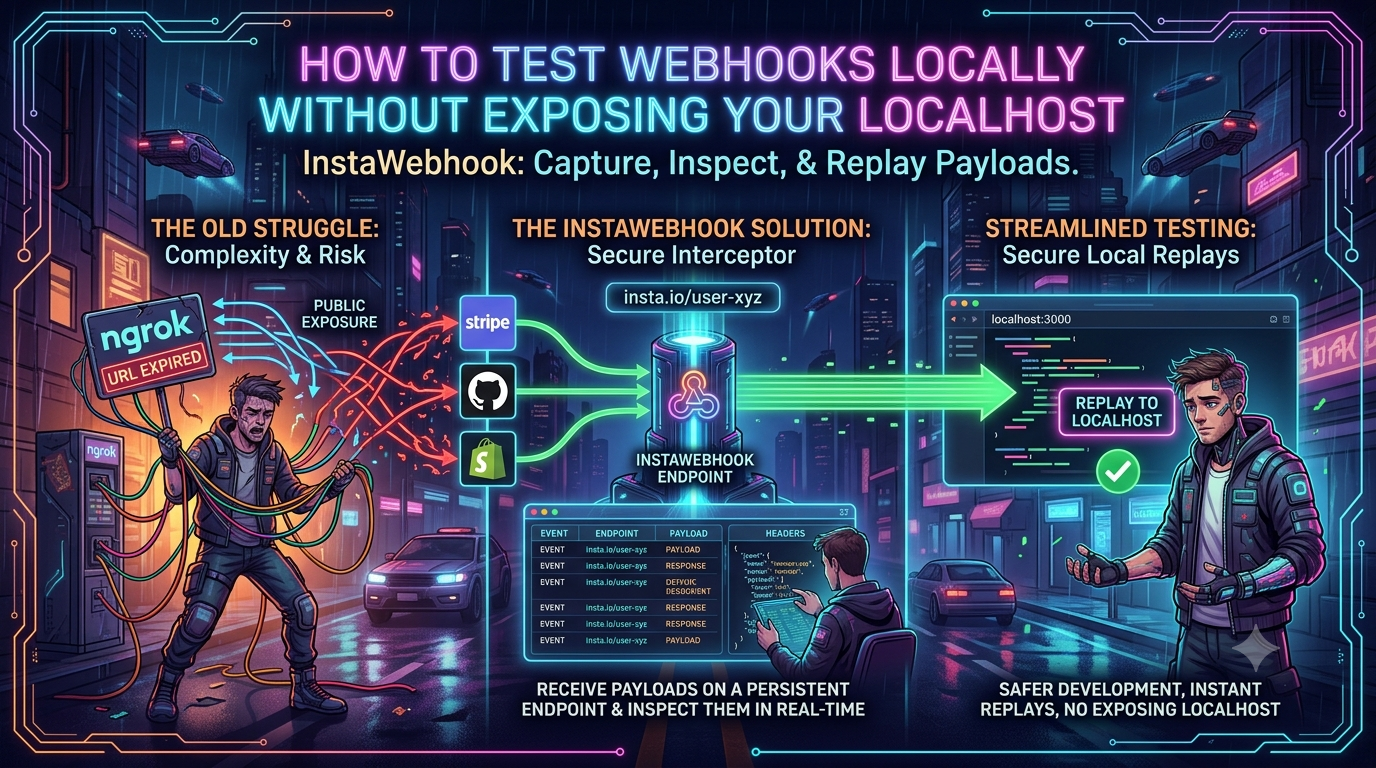
How to Test Webhooks Locally Without Exposing Your Localhost
If you're building an integration with a service like Stripe, Shopify, GitHub, or Slack, you'll eventually run into webhooks. They're the nervous system of modern APIs — asynchronous HTTP POST requests that notify your system the moment something happens elsewhere: a payment succeeds, a customer unsubscribes, a commit gets pushed.
The problem is testing them locally. Webhooks require a publicly reachable URL, and your laptop doesn't have one. localhost sits behind your router's NAT, invisible to the outside world by design.
For years the default fix has been a tunneling tool — ngrok being the household name. Tunnels work, but they come with real friction: URLs that used to reset on every restart, missed payloads when your server is down, and a public hole poked straight through your firewall. Some of that friction has genuinely improved in the last year or two; some of it is still there. This guide walks through what's actually true today, and a cleaner architecture — catch, inspect, replay — that avoids exposing your machine at all.
Why Traditional Localhost Webhook Testing Is Painful
1. The Expiring URL Problem (Mostly, But Not Entirely, Solved)
The classic complaint about ngrok's free tier was that every restart gave you a brand-new random URL, forcing you back into your Stripe or GitHub dashboard to paste in the new address. As of early 2026, ngrok addressed this directly: every account, including free ones, now gets a permanent dev domain (something like abc123xyz.ngrok-free.dev) that stays fixed for the life of the account, even across restarts.
That said, the free tier isn't unlimited. It's currently capped at roughly 1GB of bandwidth and 20,000 HTTP requests per month, three concurrent endpoints, and free-tier traffic gets routed through an interstitial "you're about to visit an ngrok tunnel" warning page that outside visitors have to click through — which is a real problem if a webhook provider's servers, rather than a human in a browser, are hitting the URL programmatically. Paid tiers ($8–$39/month) remove the interstitial and add custom domains. Other tunneling tools (Cloudflare Tunnel, Localtonet, various open-source options) have emerged with different tradeoffs on bandwidth, protocol support, and pricing — it's a more competitive space than it was a couple of years ago.
So: the "URL changes every time" complaint is largely outdated for ngrok specifically. What hasn't changed is the underlying architectural issue below.
2. The Missed-Event Problem
A tunnel only works while the underlying agent process and your local server are both running. If you're mid-restart, debugging a crash, or your laptop goes to sleep, an event sent during that window is simply gone as far as your tunnel is concerned. Some providers retry failed deliveries automatically; others don't (more on this below, since it varies significantly by provider). Either way, you're relying on the provider's retry logic to save you rather than owning the durability yourself.
3. The Security Risk of Exposing Localhost
This is the more serious issue. A tunnel is a reverse proxy that punches a route from the public internet straight to a port on your machine. If your local dev server has no auth in front of it (a very common setup, since it's "just localhost"), anyone with the URL can hit your unauthenticated local API or database. Automated scanners crawl the web constantly looking for exactly this kind of exposed endpoint.
The Modern Approach: Catch, Inspect, Replay
The fix is architectural: stop asking your laptop to act as a public-facing server at all. Instead, decouple receiving the webhook from processing it.
- Catch — A cloud-hosted inbox with a stable URL receives and stores the webhook the instant it arrives, completely independent of whether your local machine is even turned on.
- Inspect — You open a dashboard and see the exact payload, headers, and timing — no guessing about what a provider's docs claim versus what they actually send.
- Replay — Once you're ready, you pull the stored payload down and fire it at your local server as many times as you want, with the exact original bytes and headers.
This gives you a durable URL, guarantees you never lose an event to a restart, and — critically — never opens a port on your machine. Your local server only ever talks to localhost.
Real Tools That Implement This Pattern (2026)
This isn't a single-vendor idea; it's a category. A few actively maintained options, roughly ordered from "quick, disposable inspector" to "durable infrastructure":
| Tool | What it's good for |
|---|---|
| webhook.site | Instant disposable URL, zero signup, good for a quick one-off look at a payload |
| smee.io | GitHub's own officially documented tool for forwarding webhooks to localhost during development |
| Beeceptor / RequestBin-style tools | Lightweight request catchers with basic mocking |
| Hookdeck Console + CLI | Free tier with sample payloads from real providers, copy-as-cURL, and a CLI that forwards captured events straight to your local server |
| Svix Play | Similar catch-and-inspect flow, from a company that also sells webhook-sending infrastructure |
| InstaWebhook | A newer entrant focused on durable queues, retry/dead-letter handling, and BYO-database storage for teams that want the local-dev tool to mirror production infrastructure |
| ngrok's own webhook tooling | If you're already paying for ngrok, its traffic inspector and replay feature cover a lot of this same ground |
Pick based on what you actually need: a five-minute payload peek doesn't require the same tool as a durable pipeline you intend to keep using in production. The rest of this guide uses a generic "webhook capture tool" for the walkthrough — swap in whichever of the above you prefer, since the underlying workflow (get a URL → register it → catch → inspect → replay) is the same across all of them.
Step-by-Step: Testing Webhooks Locally
Step 1: Set Up Your Local Handler
Here's a minimal Express handler. The comment about raw bodies matters — more on why below.
// server.js
const express = require('express');
const app = express();
const port = 3000;

// Important: capture the raw body for signature verification.
// express.json() parses and re-serializes the payload, which changes
// the exact bytes — and signature checks are computed over exact bytes.
app.use(express.raw({ type: 'application/json' }));

app.post('/webhooks/handler', (req, res) => {
    console.log('Webhook received at:', new Date().toISOString());

    try {
        const payload = JSON.parse(req.body.toString());
        console.log('Event Type:', payload.type);
        console.log('Payload Data:', JSON.stringify(payload.data, null, 2));

        // TODO: business logic goes here — but see "respond fast" below.

        res.status(200).send('Webhook processed successfully');
    } catch (error) {
        console.error('Error processing webhook:', error.message);
        res.status(400).send('Webhook processing failed');
    }
});

app.listen(port, () => {
    console.log(`Local server listening at http://localhost:${port}`);
});
Run it with node server.js. It's now listening on http://localhost:3000/webhooks/handler — reachable only from your own machine.
Step 2: Create a Permanent Catch URL
Sign up with whichever capture tool you've chosen and generate an endpoint URL. Good tools give you something that doesn't expire or rotate — a fixed address you register once and never touch again.
Step 3: Register It With Your Provider
In Stripe, for example: Developers → Webhooks → Add endpoint, paste your capture URL, select the event types you actually need (checkout.session.completed, payment_intent.succeeded, etc. — don't subscribe to everything, it adds unnecessary load), and save.
Step 4: Trigger and Catch a Real Event
Make a test purchase, push a commit, or use the provider's CLI to fire a test event. Your capture tool receives and stores it even though your local server was never involved.
Step 5: Inspect
Open the captured event. You'll see the exact headers (including signature headers like Stripe-Signature or X-Hub-Signature-256) and the formatted JSON body. This is genuinely useful for schema design — provider docs frequently don't reflect the exact shape and nesting of what actually arrives in production.
Step 6: Replay to Localhost
Most of these tools let you export the captured request as a cURL command:
curl -X POST http://localhost:3000/webhooks/handler \
  -H "Content-Type: application/json" \
  -H "Stripe-Signature: t=1678901234,v1=abcdef1234567890..." \
  -d '{
    "id": "evt_test_123",
    "type": "payment_intent.succeeded",
    "data": { "...": "..." }
  }'
Run it, watch your server's console. Found a bug? Fix it, save, hit the up arrow to re-run the exact same request. You can replay a captured event as many times as you want without ever generating a new one from the provider — turning a multi-minute debug loop into a multi-second one.
Getting the Details Right (Fact-Checked Provider Behavior)
Timeout limits, retry policies, and signature schemes vary meaningfully by provider, and it's easy to find outdated or conflated numbers online. Here's what each one's own documentation currently says.
Signature Verification
Every major provider signs its payloads with HMAC so you can confirm a request actually came from them and not a spoofed source. The most common way this breaks in local testing: a body-parsing middleware (like Express's default express.json()) re-serializes the payload before your verification code sees it, and even a single-byte difference from the original bytes breaks the signature check. Always verify against the raw body.
- Stripe signs with
Stripe-Signatureand applies a default 5-minute tolerance on the signed timestamp to guard against replay. - Slack signs with
X-Slack-Signature(HMAC-SHA256) and also uses a 5-minute timestamp tolerance — and separately, Slack's Events API expects a 2xx response within just 3 seconds, tighter than most other providers. - GitHub signs with
X-Hub-Signature-256.
Response Timeouts and Retries — These Differ More Than You'd Think
This is the part most write-ups get wrong or oversimplify:
- GitHub: a hard 10-second timeout (documented explicitly). If your endpoint doesn't return a 2xx within that window, the delivery is marked failed. Importantly, GitHub does not automatically retry failed deliveries — you have to manually redeliver from the UI or API, and only deliveries from the past 3 days are available to redeliver.
- Stripe: doesn't publish an exact number of seconds in its docs, just "quickly return a 2xx before doing complex work." Developer community reports converge around roughly 20 seconds in practice. Unlike GitHub, Stripe does retry automatically, with exponential backoff — roughly 16 attempts over about 3 days in live mode, and just 3 attempts over a few hours in test mode.
- Slack: a much tighter 3-second window on the Events API before it's considered failed and retried.
The practical takeaway is the same regardless of provider: do the minimum synchronous work (verify signature, persist the raw event, return 200), and push anything heavier — sending emails, calling other APIs, generating files — onto a background queue. Simulating this locally is easy: add a deliberate setTimeout to your handler and confirm your provider's dashboard actually flags it as a timeout at the threshold you'd expect.
Idempotency
Webhook delivery is "at-least-once," not "exactly-once" — providers may legitimately send the same event twice (a retry after a slow response is the most common cause). If your handler isn't idempotent, that duplicate can mean a double-charged customer or two receipt emails. The standard fix is a unique constraint on the event ID and an upsert-style write, e.g. in Postgres:
INSERT INTO processed_events (event_id, payload)
VALUES ($1, $2)
ON CONFLICT (event_id) DO NOTHING;
Check the row count afterward — if nothing was inserted, you've already handled this event and can skip reprocessing. You can test this locally by firing the same replayed cURL command twice in a row and confirming no duplicate side effects occur.
Why This Pattern Holds Up in Production, Too
The catch-and-replay architecture isn't just a local-dev workaround — it's a legitimate production pattern. The properties you want locally are the same ones you want in production: durable intake that doesn't depend on your application server being up at the exact millisecond an event arrives, a full audit trail of what was received and when, and the ability to selectively replay specific events after fixing a bug rather than re-triggering an entire batch from the source system. Several of the tools above (Hookdeck and InstaWebhook among them) are explicitly built to scale from "local dev inbox" to "production webhook gateway" without changing your integration code.
Conclusion
Testing webhooks locally used to mean picking between a fragile tunnel and a live production endpoint you didn't fully trust. That tradeoff is largely gone now. Between ngrok's improved free-tier static domains and the growing set of dedicated catch-inspect-replay tools, you can build a debugging loop that's fast, durable, and never exposes your machine to the open internet — while getting the exact provider behavior (timeouts, retries, signatures) right the first time instead of discovering it in production.